Stethoscope Embroidery Design: A Designer’s Practical Review
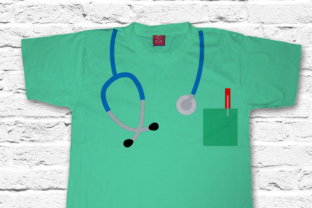
When a medical student’s graduation gift landed on my worktable, I knew I needed a design that felt both playful and professional. The Stethoscope graphic caught my eye immediately. The description promised a clever layout — two curved stethoscope tubes, a tiny pocket, and a pen tucked inside, all meant to be stitched right around a shirt collar. I saw whimsy, but I also saw a design that could easily become a staple in any craft business serving healthcare workers.
I loaded the file, prepped my test fabric, and started stitching. What follows is my honest take after running this design through real embroidery scenarios, from a boutique tote bag to a custom sweatshirt.
First Impressions and Visual Personality
Right out of the digital folder, the Stethoscope design feels cheerful and crisp. The mirrored tubing creates a balanced silhouette that frames a neckline beautifully, and the pocket with a pen adds a storytelling detail — it’s not just a medical tool, it’s a nod to daily clinical life. The overall mood is friendly, smart, and a little bit adorable, exactly what you’d want for a nursing school graduation tee or a “world’s best doctor” onesie.
The visual weight is moderate. The two stethoscope ends form a gentle V-shape, with the pocket sitting right at the center. This makes the design feel anchored, not floating. Even in a black-and-white preview, the shapes remain distinct, which is a good sign for stitch clarity. I’d describe the personality as approachable and polished — it works equally well for a child’s gift and a professional’s casual scrub top.
How the Stitching Actually Holds Up on Fabric
I tested the Stethoscope on a medium-weight cotton tote bag and a fleece-backed sweatshirt. On the tote, I used a tear-away stabilizer and a 75/11 needle. The tubing lines, which are primarily satin stitch, came out clean and smooth. The pocket was constructed with a mix of satin borders and a light fill stitch, and the pen detail — a tiny rectangle with a clip — held its shape better than I expected. No puckering, no thread breaks, even when I ran the machine at a moderate speed.
On the sweatshirt, I switched to a cutaway stabilizer because the fabric had some stretch. The design still performed well, but I did notice the satin stitches on the pocket edge wanted to sink slightly into the fleece. A quick density adjustment fixed that, and the final result looked professional. The pen detail, however, is very small. If you’re using a dense thread like metallic for the clip, it might clog. I’d recommend sticking to a standard 40-weight polyester thread for that area.
Thread color choice plays a huge role here. I stitched one sample with navy tubing and a silver bell, and another with classic black tubing and a bright red heart on the pocket. Both looked great, but the lighter tubing on dark fabric faded a bit. I’d suggest adding a subtle outline, a running stitch, or a contrasting background fill if you plan to use this on charcoal or black garments. The design’s flexibility means you can easily customize the color palette to match school colors or hospital branding.
Where This Design Shines in Real Projects
After testing, I can confidently say the Stethoscope belongs on a handful of product types. Here’s where it naturally fits:
- Custom apparel: T-shirts, sweatshirts, and hoodies with the design hugging the collar. It’s the exact placement the description suggests, and it looks just as charming in person.
- Tote bags: Positioned on the upper center or even on a small front pocket, it turns a plain grocery bag into a thoughtful nursing school tote.
- Baby onesies: A soft, smaller version of the design on a onesie makes a perfect gift for a doctor’s newborn. Just reduce the stitch count slightly to keep the fabric flexible.
- Pillow covers: A crisp white pillow with the design in the corner adds a sweet touch to a clinic waiting room or a medical student’s apartment.
- Embroidered patches: Stitch it on felt or twill, cut out the shape, and sell it as a sew-on patch. The pocket detail makes it instantly recognizable.
- Holiday and graduation gifts: Pair this design with a name and graduation year, and you have a keepsake that families will treasure.
From a craft business perspective, this design hits a niche that’s always in demand. Medical professionals, students, and proud family members make up a loyal buyer base. An Etsy seller or small shop owner can easily build a whole collection around this one graphic, and because the design stitches relatively quickly, you can keep production time manageable.
Practical Considerations for Embroidery Crafters
Since this file comes from the Crafts category as a Graphics product, it’s essential to double-check the format before you load it into your machine. The description mentions an SVG, which is a vector graphic — not always an embroidery file. Before you stitch, verify whether you have a fully digitized embroidery file (like PES, DST, or EXP) or if you need to convert the SVG yourself. If you’re digitizing from scratch, pay close attention to the pen and pocket details. Those tiny elements need underlay and proper pull compensation to avoid gaps.
My standard checklist when evaluating any new design applies here:
- Test on scrap fabric that matches your final product’s texture and weight.
- Check thread color contrast, especially on dark or heathered fabrics.
- Review stitch density. If the design feels too stiff, open the file in your software and reduce the fill density by 10–15%.
- Confirm hoop size. The wide spread of the two stethoscope ends requires a hoop that can accommodate the full horizontal width. A 4x4 hoop may work if the design is scaled down, but a 5x7 or larger gives you more breathing room.
- Inspect small details like the pen clip. If they close up, you may need to simplify the path or slightly enlarge that section.
- Always confirm the license if you plan to sell finished items. Most commercial projects require a commercial-use license.
Fabrics and Surfaces: Where to Use Caution
Not every fabric will welcome this design with open arms. Because the Stethoscope relies on clean lines and a tiny pocket detail, I’d avoid heavily textured surfaces like terry cloth, waffle weave, or high-pile fleece. The tubing will look wavy, and the pen will simply disappear.
For stretchy fabrics, a cutaway stabilizer is non-negotiable. I’d also recommend a water-soluble topper on top of knit garments to keep the stitches from sinking in. On thin fabrics like a lightweight t-shirt, the satin columns might pull the material, so use a soft mesh stabilizer and consider a slightly lower tension setting.
Curved surfaces, such as caps, present a challenge. The design is relatively flat and horizontal, so it may not conform to a cap’s crown without distortion. If you must stitch it on a hat, test the placement on the side or the back, and use a cap-specific hoop and backing. For baby clothes, keep the design small and soft, and avoid any dense fill that could irritate delicate skin.
How the Design Lifts Product Value and Buyer Engagement
When a customer sees this Stethoscope design on a finished product, the reaction is usually a smile — and that’s the kind of emotional connection that sells. The pocket with pen detail signals that you’ve put thought into the design, not just a generic medical symbol. It feels personalized, even before you add a name.
For a handmade business, this translates into higher perceived value. A tote bag with a well-stitched, playful stethoscope can command a higher price than a plain one. The design also photographs well for product listings, especially when contrasted against a clean background. From a branding perspective, it’s cohesive and easy to pair with other medical-themed designs, helping you build a consistent shop identity.
Giftability is another strong point. A stitched stethoscope with a pocket and pen makes a graduate feel seen, a new nurse feel celebrated, and a doctor feel loved. It’s the kind of design that gets shared on social media, expanding your reach organically.
Final Designer Notes Before You Stitch
The Stethoscope design brings a lot of practical joy to the embroidery table. It’s not overly complex, it stitches cleanly with the right settings, and it fills a real need for medical-themed projects. I’ve already added it to my go-to folder for custom orders.
Before you run it on a final product, take a few minutes to test on scrap, dial in your thread colors, and choose the right stabilizer. If you’re working with the SVG file, digitize carefully or source a pre-digitized version that retains the pocket and pen charm. Check your commercial license, then start stitching. The finished product will speak for itself — and your customers will appreciate the thoughtful detail that turns a simple design into a memorable gift.